Tag Archives: food blogs

{(not-the-first) homemade maryland crab soup}

7 Mar

i am undoubtedly a marylander in this one particular way… i could unabashedly eat crabs almost every day!

{also, i’m a poet and didn’t know it} 

okay, maybe not every day, but like… all the time.

if you know you know… in that, maryland is known for their blue crabs… caught fresh off the chesapeake bay and steamed in savory spices like old bay or JO and a bit of local beer… served piping hot with corn, potatoes, and sometimes hush puppies.

but also, recreated in a simple vegetable soup… which freezes comfortably and easily.

so, that’s what i did last summer… bought a bunch of steamed maryland blue crabs… hand-picked them all… saved (most) of the meat… added it to my homemade soup recipe… and froze it…

and NOW! i get to enjoy it in the colder months… share it with friends and family… and reap the benefits of my patience, self-control, and overall appreciation for homemade preserved food…

i sometimes also make a cream-of-crab soup/dip and i’ll mix the two… this picture/recipe below is classic maryland crab soup with a tomato base. my favourite preference for sure.
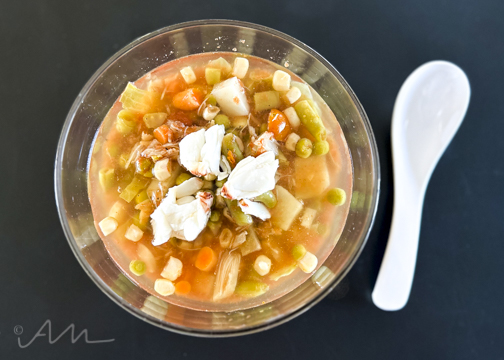
audrey michelle’s homemade maryland blue crab soup :

  • 28 oz. crushed tomatoes of choice
  • 32 oz. chicken and/or veggie/seafood stock
  • 1 can light beer (yuengling is my choice)
  • carrot
  • celery
  • onion
  • garlic
  • corn
  • potatoes
  • cabbage
  • green beans
  • tomatoes
  • fresh lemon
  • OLD BAY!!!
  • S&P to taste
  • 1 pound crab meat (or as much as you want!)

typically, i build my soup in “layers” – starting with sautéing the mirepoix mix in a little olive oil and/or butter… splashing some white wine in the pan, then adding the broth… next, the canned tomatoes (or blending a little of both and then adding to the pot)… then, depending on if you are using fresh or canned veggies – add those in layers also… if fresh – start with potatoes and a little crab meat… then add in green beans, cabbage, corn, potatoes, tomatoes, and lastly tomatoes… add old bay to your preferred taste, S&P, and finish with more crab meat. i like to layer in my crab meat for flavour but also because the meat will break down and “shred” as it’s cooked… therefore, the final step for me is to add in crab meat at the very end while it’s cooling (whether or not i’m freezing or serving immediately) and then i also serve it with a fresh jumbo chunk on top and a sprinkle of fresh parsley, squeeze of lemon, and more old bay.

this is hands-down my favourite soup of all time. have you ever had it?!


NOM NOM !!!

{homemade chow chow}

14 Sep

i had never heard of chow chow until i lived in the south a few years back. y’all know i’m a big fan of sauerkraut… and this has similar ingredients, but with a different taste and process. chow chow is not fermented, although i’m certain you could change the ingredients and i bet a ferment would also taste amazing!

what i enjoy about making stuff like this is you don’t have to be so specific. you can play around with different measurements and/or sizes of veggies, combinations of veggies, etc. being in the kitchen is all about exploring, and i love to “play” with my food… and that is something i will never stop doing! 😀

some recipes that i explored suggested adding green tomatoes and/or spices or hot peppers… but this is what i came up with :

simple ingredients :

  • cabbage
  • onion
  • green pepper
  • red/yellow pepper

simple brine :

  • 1/4 cup salt
  • 1/4 cup sugar
  • 1 cup vinegar
  • 1 cup water

start by heating brine ingredients in a sauce pan on low-medium heat until salt and sugar dissolve, then allow to cool to room temperature.

if you find that you have extra brine, you can always save it for something else like pickles or whatever other veggie you may want to use.

meanwhile, finely chop up all of the veggies…

pour {slightly cooled} brine mixture over the ingredients…

take some pictures, if you fancy…

then, add lid and store in the refrigerator for about a week. you can also use this same recipe and then pressure can or water-bath can and store in the pantry.

i made it both ways and both were delicious! i have one more jar left in the pantry, and i have been using the jar in the fridge for all kinds of fun stuff! it is SO GOOD with sausage or on a pork roll/bun… it adds the perfect balance of sweet to the savory. and it’s also good as a little snack or adding it to a charcuterie board or on a cracker, etc.

one thing I do like about the “canning” method is that the texture is a little softer. heat-processing this does break down the veggies a bit more and although i like it both ways, i do prefer the canning method. the nice thing is, canning is always an option even if i start with the fridge method.


do you like and/or make chow chow?! please share your comments and/or recipes below!


{candy cane beets – aka chioggia beets}

19 Jul

these are one of my all-time favourite vegetables! i do enjoy beets, but i mostly enjoy these because of the way they look! from the outside, you wouldn’t know that they looked like this inside. but that’s part of what i love about them!

please meet the “candy cane beet” – also known as “chioggia beet” – aren’t they just magnificent?!

my two favourite ways to eat them are :

  • raw, sliced thin, with himalayan pink salt
  • steamed then cooled to room temp, just as is

fun food facts :

also known as “bulls eye beets” – this unique specialty produce item has a sweeter, more robust flavour profile compared to its other beet cousins. they are named after a region in italy, where they predominantly grow. chioggia beets are an excellent source of manganese, folate, vitamin c, magnesium, potassium, and fiber. the leaves of this vegetable are also edible, and serve well sautéed, steamed, or as a chard substitute. 


{inspired by : big salad, little steak}

4 Jul

oops, this email was accidentally sent out last month – my mistake… anyway, happy summer, y’all!

i found this recipe through an instagram account {@katherinewants} and i was inspired to try it.

it’s adorably called – “big salad, little steak.”

i have been eating this at least 1-2 times a week, lately. it satiates me in such a way, and it’s also easy to make {now that i’ve mastered it}. i used to be so intimidated by cooking steak… i would always overcook it and/or ruin the overall taste or quality. so i hadn’t tried making it in years. then i discovered this recipe and method for cooking steak, and i am proud to say i’ve been nailing it every time! i don’t have a grill, so using a cast iron pan is perfect for my apartment lifestyle.

i believe three key factors make the main difference in how this steak is prepared :

  • quality of steack
  • quality of butter
  • basting!!!

the best meals always start with some of the simplest ingredients : 

  • grass-fed strip steak
  • garlic
  • shallots
  • rosemary & thyme
  • grass-fed butter
  • romain lettuce
  • parmigiano reggiano
  • caesar dressing

the best meals also start with some of the simplest techniques :

  • bring steak to room temperature
  • season steak liberally with salt & pepper
  • add steak to a very hot cast iron pan and sear on one side for approximately 2-3 minutes
  • turn steak on its side to render the fat
  • flip steak to other side and add butter, garlic, shallots, and herbs
  • baste, baste, baste – approximately another 2-3 minutes or until internal temp of 110
  • remove from heat and allow to rest

slice steak to your desired thickness. serve with caesar salad {croutons optional} and a glass of prosecco {maybe-not-so-optional ;)}. Continue reading

{homemade gummy bears}

9 Oct

i have been making my own homemade gummy bears for a while now, and i have been meaning to write a post about it…

i have always loved fruit snacks, gummy bears, et al. however, the ingredient list always detoured me – even the natural ones are full of mostly sugar.

so, i did some research and realized that i could be making my own gummy fruit snacks! and not only that, but i could make them GOOD for me!

my curiosity was piqued when i started looking for a clean source of gelatin to help with collagen production and joint support.

…which i don’t have pictured here because i typically transfer everything i buy into a glass jar… {no shame in my game}…

anyway, i wanted to incorporate gelatin into my diet and that’s when i got super stoked about the idea of making my own gummies! so i found these silicon molds on amazon {along with the gelatin} and looked up a few recipes to get me started.

as usual, i like to keep things as simple as possible. some recipes call for honey or a sweetener, but i like to avoid added sugar where i can {so i can guiltlessly enjoy a candy bar from time-to-time}.

so – here is my very simple {2-ingredient!} homemade gummy fruit snack recipe – which yields about 200 gummies and the ratio can be adjusted accordingly :

  • 1 cup fruit juice {i usually opt for concord grape}
  • 3 tablespoons gelatin powder

you could add in some honey or agave for sweetness, but i find the concord grape juice to be sweet enough on its own.

sometimes i’ll add in some elderberry syrup for additional health benefits during the cold-season months. Continue reading

{simple (rainbow) pasta salad}

22 Sep

as you probably know by now, i like to eat with the seasons as much as i possibly can. i enjoy it for lots of reasons. i always look forward to eating whatever vegetables or fruit are best during that particular time of year… and it makes me appreciate them more.

that said, i often struggle with “transitional” times of year – such as the month of september. i find myself unsure about what to wear, what to eat, when to go to sleep. it’s kind of funny but it’s true. {this also applies in the month of may.}

anyway, because i find september to be a transitional month, i also find myself eating transitional foods. i made that term up, but my point is that i’m not ready to start eating soups and squash, but i’m also done with light foods like salads and such. during this transitional time, i usually prepare foods that can be enjoyed hot or cold. and pasta salad is one of those dishes i could enjoy every day during transitional months.

i also really love orzo and i don’t use it often enough.

i whipped up this simple {rainbow} pasta salad and made a huge batch to take to work for lunches.

it’s so easy and so i thought i’d share the recipe… even though i didn’t measure anything, as per usual… but it’s so simple – just chop and toss!

————————————

simple pasta salad : 

  • cooked orzo
  • diced summer sausage
  • chopped tomatoes
  • sliced olives {black & green}
  • diced red onion
  • diced banana pepper
  • diced green pepper
  • diced cucumber
  • roasted garlic
  • crumbled parmigiano reggiano

homemade dressing :

  • olive oil
  • apple cider vinegar
  • spices :
    • oregano
    • sage
    • parsley
    • comfrey
    • basil
    • dill
    • tarragon
    • garlic
    • onion
    • salt
    • pepper
    • bit o’ parm reg


i like to serve mine at room temperature and i sprinkle crumbled italian breadsticks on top…

SO GOOD!


{foodie friday : vegetarian buffalo cauliflower bites}

2 Feb

i kind of made these by accident… as in, i-got-super-hungry-and-didn’t-have-much-in-the-fridge-to-eat-but-got-creative-and made-these-buffalo-cauliflower-bites-which-accidentally-turned-out-to-be-ahhhmazing!

…and so i just had to share the recipe. these {veggie} buffalo cauliflower bites would make a great game-day snack for superbowl sunday! and they are a great vegetarian alternative to the classic buffalo wing. {i would devour both!}

i was inspired to make this dish because i was scrolling through instagram and spotted a recipe for cauliflower florets that were battered & fried, and served with buffalo sauce and ranch – like a chicken wing! and i was thinking, “that’s probably sooooo delicious!” 

then i remembered that i had frozen riced cauliflower, and i created my own version based on what i had in the fridge…

very simple ingredients : 

  • frozen riced cauliflower
  • chopped celery hearts
  • buffalo sauce {i opt for franks!}
  • ranch dressing {i use brianna’s!}

i began by chopping the celery into approximately 1-inch pieces…

next, i sautéed the cauliflower with a little butter over medium to high heat, adding a little water as i went along to soften the cauliflower a bit more…

then, i added in some buffalo sauce to taste, and cooked until almost al dente…

finally, i scooped some of the cauliflower mixture into the celery bites and drizzled a little ranch dressing on top. it can be a little messy, but that’s what buffalo sauce is all about, right?! 😉

these little buffalo cauliflower bites are soooooo yummy and i will definitely be making them on game-day! it’s always funny to me when i cook something on the fly and it turns out to be my new favourite thing ever.

this was one of those recipes. 🙂


by the way, i didn’t watch one single football game this season, and i could care less about the patriots or the eagles… but it should still be a fun day full of snacks and silliness!

{homemade relish with my homegrown cucumbers!}

11 Jul

so, as i mentioned in my last blog – i have harvested well over 200 cucumbers this year from my garden! i wish i would’ve been weighing my harvests, to get more of an idea of yields. however, looking back through the fotos i snapped every time i harvest – it’s safe to say that number is pretty accurate. crazy, right?

anyway, on top of sharing my harvests with neighbors, and consuming a cucumber a day, i also enjoy making pickles and relish with my cucumbers! that’s why i specifically grow the pickling cucumbers. that, and i just think they taste better.

i will share my pickle recipe soon, but for now i want to share this super yummy relish recipe that a good friend of mine passed along to me last year. i love it because it’s very simple and does not have added sugar. the only sweetener is honey and i think it is so well-balanced in flavour. i love add my relish to egg salad or tuna salad. it’s also just good right out of the jar!

homemade pickle relish recipe : 

  • 1.5 pounds {pickling} cucumbers, finely diced {mine was homegrown}
  • 1 small onion, finely diced
  • 1 green bell pepper, finely diced
  • 1.5 cup distilled white vinegar
  • 6 tbsp honey
  • 1/4 cup chopped fresh dill {mine was homegrown! 🙂}
  • 1 tsp mustard seeds
  • 1 tsp turmeric
  • 1 tsp kosher salt {i used himalayan pink salt}
  • 1 tsp celery ceeds
  • 1.5 cornstarch

directions : 

  • in large saucepan, combine all ingredients except cornstarch. simmer over medium-high head until vegetables are tender – about 8-10 minutes.
  • in small bowl, whisk together cornstarch and 2-3 tbsp of the cooking liquid until smooth. add to pan and let cook another 3-5 minutes. cool.
  • use canning method to preserve, or store in airtight container, chilled, up to 1 month. also freezes well.

i made a lot more than what is pictured – this jar i gave to my neighbours. 🙂

i also tasted mine before adding the cornstarch. if i needed to increase any of the ingredients, i did. i think i added a little extra honey and vinegar to mine because i had a little more than 1.5 pounds of cucumbers. the key is to start with small amounts… you can always add more. i love the colour it turns out – that’s largely due to the turmeric.

i hope you enjoy this recipe and please do let me know if you ever try it out!

thanks for reading! 🙂